Wednesday, 13 May 2015

Samsung New Launch For Arduino


When you think about Samsung, the first products that come to mind are probably phones or televisions, not Maker-focused electronics. Today, with their announcement at Internet of Things World, Samsung has entered the Maker world with their ARTIK platform, an Arduino compatible family of devices targeted towards Internet of Things applications.

Combining this powerful hardware with the ease of use and existing knowledge base of the Arduino platform, Samsung hopes to make development of IoT platforms easy to get off the ground:
Currently there are three ARTIK devices: The ARTIK 1, ARTIK 5, and ARTIK 10. All are multi-core ARM processors with built in Bluetooth Low Energy. The ARTIK 5 and 10 also include Wi-Fi, BT, Zigbee, and Thread wireless connections.
“Our approach is to provide open platforms to help accelerate the development of IoT for our customers, developers, and end users” said Curtis Sasaki, Vice President of Ecosystem, Samsung Electronics. “Being part of Arduino’s Certified Program helps millions of developers familiar with Arduino IDE to take advantage and focus all of their energy to building new and innovative products.”

Tuesday, 12 May 2015

Arduino lesson 5 : Getting started with Arduino boards

Choosing board :

  1. First of all determine your type of project.
  2. What kind of hardware you needed to complete the project ?
  3. Have a look on budget you want to spend on project.
  4. Determine the number of Inputs/outputs for project.
  5. Always choose the board that suits your needs.
  6. Have a look on the processor of board about its speed memory speed and version.
  7. You can also include size in here as Arduino mini and Pro mini are smaller enough for little spaces.
  8. Try to get authentic arduino board listed on its original website for better support later on.
  9. Search on you own behalf to get familiar with that board you have chosen to buy and read reviews on it so you can judge more precisely.


Mostly arduino boards exhibit same properties and can be programmed as alike but for my own sake of demonstration i will here choose Arduino UNO R3 board.

Go get you board :

    There are many sources from where you can buy your own arduino board online sources like its own original site the arduino distributors list is also available on their main site.

You can also order one at ebay.com and in Pakistan digipak.org and arduinopak.com on your own behalf. 


First tests :

Once you get your board in your hands its time for real fun with it to do some initial tasks so come on lets do together.

Here I assume that you have arduino IDE software installed on your PC and have a arduino UNO R3 at your hands.


  1. Carefully inspect your board that it is not broken or damaged during shipping or don't accept the opened package.
  2. Insert the the USB cable in arduino board USB female jack and other side of cable in your PC.
  3. let the PC identify the serial port for board and drivers for arduino board will automatically be loaded into PC once attached through USB port.
  4. Open up the Arduino Software in you PC and follow this sequence.
    File>Examples>Basics>Blink.
  5. Once correctly opened Upload this code to your attached board and wait for at least 10 seconds to see the results.
  6. Now if uploaded correctly without any error you will notice that the on board LED of Arduino will start blinking continuously after short intervals as defined in code.
  7. If this step goes correct you have done it correctly and uploaded your first code into your arduino board the one of the most basic codes used for testing.
  8. Notice that every time you unplug your board from PC and then connect again the LED will automatically start blinking without again uploading code example.

Arduino lesson 4 : About coding and tips

About coding :

officially arduino software supports C language but i think that many of the built in functions made it very charming to use in codes as if someone thinks of C as older version of programming language but it is very very easy to get adapted to the IDE of arduino and get started with C language with very little efforts.


although its C language but keep in mind that here this language more related to the hardware programming and here we use it to programmer our arduino boards.

Tips and techniques :


  • Using the built in functions and definitions wisely will help u a lot getting your task done in few lines rather then a bunch of lines.
  • Have a cup of tea or coffee with you whatever you like it will release your tension while programming.
  • Making logic in programming is not much difficult if given some concentration.
  • Always keep an eye on Curly braces " { }" if doubted or misplaced for a longer codes you can just count their number they should be even count at end (my trick mostly works).
  • Try to omit errors with calm rather then reducing one error and creating other errors or logical mistakes.
  • Do research before you actually try on hardware if not sure how to do it actually.
  • Try to be consistent with your programming style like if i declare an object with name "obj1" then it would be easier for me to remember but not for someone else.
  • Do a complete research on the board you are going to use for your projects. it will open many gates of successful programming and also you will enjoy coding your board.
  • Try to build small codes first. Then switch to bigger ones or edit smaller ones by adding functionalists in them step by stem and keep checking for errors consistently.
  • Although many third party hardware can be attached to Arduino boards but i will not prefer them as because you can not use many of the built in functions with them or simply the board is not supported by the software itself. 
  • Always try to keep the hardware in mind so it will be very easy for you to remember pin numbers in arduino boards and also using different marker or comments will help you a lot.
  • Be sure to select the right board and serial board for succesfull uploading to board.
  • Keep an eye on board for blinking of onboard Led's to see is actually code is being uploded or not.
  • Use hardware serials for communication with other hardwares and software serials for one way communication (I found this trick helpfull to me once will discuss later on).

Arduino lesson 3 : About software :

About software :

All boards of arduino can be attached to one's PC with USB cable provided with package, but you have to install the recommended software for arduino board to be identified by computer and further processing.

Having software installed in your PC will let you power up your arduino board with your own codes at your hands because you can upload your codes and test them directly on hardware as many times as much your hardware doesn't get burnt.

The IDE provided by the arduino developers itself is a good way to start with as it has built in libraries to use and many much examples for different shields and as many functions u  can use for different boards directly.

Being more specific user can enjoy freedom of having a good support by this software and also provides you with the serial monitor options so you can take inputs and see output as accordingly on PC screen to manage and judge your code responses, and users can directly communicated with serial devices like GSM shields and other boards. the orignial arduino IDE looks like this.


You can download this software here. After clicking this link the download will automatically get started if not then u can visit this link to manual download the software from original site.


ARDUINO 1.6.4 :

The open-source Arduino Software (IDE) makes it easy to write code and upload it to the board. It runs on Windows, Mac OS X, and Linux. The environment is written in Java and based on Processing and other open-source software.This software can be used with any Arduino board.

Getting familiar with Software :


To get started with the arduino boards it is very essential to know all things about software itself because before using hardware you will get into software to write codes for your board and then you will be able to test it on hardware after successful uploading.

First look :


when u firstly install the software it will look like this.

Brief description of every corner you will see


Starting new files and examples :

You can just follow pics to get to examples or start new file to write your own codes.


You can also get into different types of examples and after clicking on it a file will open in which the code is already written .

Edit your code :

 Once you have written your code you can use these handy option in edit menu bar.

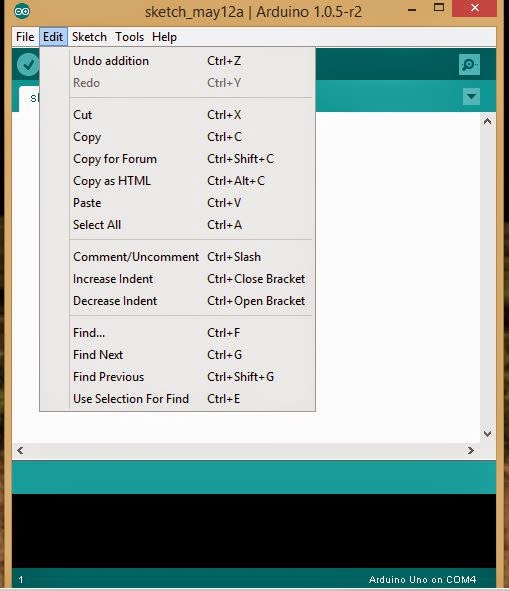
Edit menu description

Sketch and import libraries of your need :


You can import different libraries to use their predefined functions and methods to reduce your lines of code and complexity the will help you a lot in writing efficient codes for hardware and external devices attached like LCD shield and GSM shield.


Tools for selecting board and serial port :


One should surely select the correct model and board of arduino from tools-board sub menu. it is must to do correctly because without this you cannot upload your code to your board correctly.


choose correctly the serial port from the serial port menu although mostly it is already selected by arduino software itseld but don't let it be do it your self for more authenticity.


Final thoughts :


You should know how to use this software it will let you do your work more efficiently and quickly so besides writing your own methods and writing codes of hundred lines try to use its predefined functions and methods so it will be pretty short and well defined code for your hardware also it will be more error prone.


Feel free to ask for more info leave your questions on comments section below


Arduino lesson 2 : About hardware :

About hardware :
                                           
There are three type of hardware the company producing
  1. Arduino boards;
  2. Arduino shields.
  3. Arduino kits.                    

Arduino boards :

There are plenty of hardware boards are available in market and online stores and also you can  directly buy them at "arduino.cc". I will provide you with the boards names their comparison so you can easily decide what type of board suits your need. Here it is

Table of comparison :

hardware board comparison taken from arduino.cc

This is the original comparison provided by the original website arduino.cc but it simply helps user a lot to decide which board he is going to buy or which one suits his needs best.

I will here include pictures of some most popular boards over time. You can just click on their names and visit the main website for more details.
Arduino LilyPad Simple

                                                 Arduino Robot

Arduino Fio
Arduino Mini
Arduino Nano
Arduino Gemma
Arduino UNO R3
Arduino Zero
Arduino Mega 2560 R3


Arduino leonordo
Arduino Yun
Arduino Tre (upcomping)

Arduino Ethernet

Arduino micro
Arduino Esplora

Arduino Due


Arduino Pro


Arduino shields :

Arduino shields are those hardwares that can be attached to arduino boards directly or indirectly so the functionality of board can be extended for more effective usage and to do complex tasks more efficiently. Here are some shields that are built by arduino and mostly used.


Arduino GSM shield

Arduino Ethernet Shield


Arduino Wireless Shield


Arduino WiFi Shield


Arduino USB Host Shield

Arduino Motor Shield R3


Arduino Kits :

Kits are those hardwares that contains different hardwares to get started with so by using them one can get familiar with the tricks ans techniques of using hardware related to arduino and also they help a lot for making the small do it yourself project to build confidence in user so he. she can proceed further for more exploration of different hardware and software.


Arduino Starter Kit


There are also some third party Kits and accessories so you can also buy or search for them for customized use in projects like Sparkfun products, adafruit products. Some builders also producing some certified sheilds and accessories like programmers kits , LCD displays , USB serial converters and Sensor and all other hardwares that can be in anyway connected to arduino boards.


If  you want more information about specific hardware leave your comments here and i will provide you with more of practical knowledge of these boards.

Arduino Lesson 1 : Arduino & About company

Arduino :
Arduino is a hardware for making such intelligent computers that can sense and control more of the physical world than your desktop PC ever can. It's an open-source platform based on a simple AVR/Atmel micro-controller boards, and IDE for writing software for the board.
                                                                                                      Visit Arduino.cc
Arduino UNO R3


About company :
 Arduino is founded by Massimo Banzi, David Cuartielles, Tom Igoe, Gianluca Martino, and David Mellis. They are the actual motivational buddies who started to get together and raised this open source plate form which facilitates  electronics guy to professionals. Now its becoming the most lovable hardware for most of the hobbyists over all the world just due to its user friendly nature easy to handle and implementation is so easy for anyone at beginner level.
The fist arduino is introduced in 2005, and according to Adafruit industries estimated that in 2013 700,000 official boards are in user's hands.
Company is still growing and producing its boards in itlay originally and spreading them to rest of world. Nowadays arduino is being used in almost all levele from little hobyyists project to professional level projects as company launched many different board according to users needs.

Friday, 1 May 2015

Technology lessons and tuturiols

Top 5 inventions for 2014


Transparent Displays


Although its been a long time of LCD being developed but now its time of its extremeness in world about its new and fascinating types just like here one picture of transparent lcd is shown these are just amazing to use and watch and also very much portable and then they also have a type which is flexible too

Aeromobil


This is incredible invention a car that turns into an airplane just in minutes and ready to fly.this is obvious for any person that it is luxury and have both capabilities of car and airplane with all controls and wings spreaded wide also awesome and sleek look with nice white and blue color used by the designer and taking the dream into reality.

Virtual reality glasses

This is one of the most fascinating invention about 3d glasses and now it comes about virtual reality glasses that the user can experience it self in the same situation as displays in glasses and also can hear and feel the environment as desired.
                                  

Smart Wrist bands

Apart from the usage of smart phones in last decade it is now time to move on to the next generation smart phone associated wrist bands that they are capable of doing all functionalaties just as one smart phone can and also the are capable of having enriched with high multimedia systems like smart projects and sensors. 
      

Hower bike

it is strange and awesome invention started from australia and hower bike is just as simple bike but its awesome capability of flying makes it different from others bike it can hower above the ground and can travel at 73km/h as testing range and as likely designed to controlled by one person.